
Maybe you are a soon-to-be homeowner or you just want to renovate your home and install new siding. For either case, you will need a step-by-step guide to taking you through every step, especially if you are a newbie in that area. Described below is a step-by-step guide for installing siding and you need to follow every step with precision and meticulousness to ensure you get the best output.
But, before we get to the steps, here are three major things you need to have in mind beforehand
The type of siding material you choose will determine how fast you will work, how long your siding will last and how much you will spend on repairs.
High-quality material equals high-quality output. Besides choosing the right siding material, you should also consider the quality and price, and all these depend on the brand you choose to use. One of the best engineering wood brands you can consider is KWP.
Lastly, the place from which you get your siding material is of great significance and it determines both the quality and price you will use. Getting your engineered wood siding from reputable stores like Sherwood Lumber will not only allow you to get an irresistible deal, but you will also get a chance to seek advice on the siding and other building materials.
Step-by-step guide for installing siding
Now that we have looked at those three, let’s get to the step-by-step guide for installing siding.
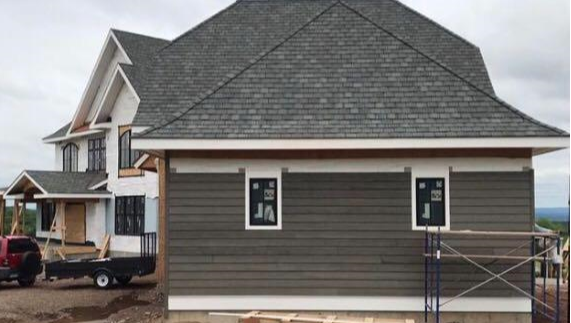
Install the trim
Here is a little something about the trim, it should always be a little thicker than the siding you intend to use so that they are compatible and fit properly with each other.
Use a 3-inch trim with a 4-inch wide piece for the header on the windows and doors Install it on all the windows and door leaving an
After trimming all the windows and doors, now install 6-inch wide profile trims on the outside corners as well as along the gable roof.
The outside corners also need to be trimmed. Cut a fitting length of trim according to the lengths of your outside corners and install them. For all the trims, install using a pneumatic siding nailer, nailing gun or a hammer. For the nails, use stainless steel siding nails and ensure they lay flush with the wood surface.
Install the starter
The starter is basically the thin piece or strip usually installed at the furthest bottom. It is, in most cases 1-inch and usually installed underneath the first course. Since siding needs a little overlap, this starter helps stimulate that.
Install the starter with a clearance of 1-inch. In the case of a concrete foundation, install the starter 1 inch between the wood framing and foundation.
Prepare the siding
Due to variations in weather conditions, it is important that as you cut your siding, you should leave a small allowance for contraction and expansion. In this case, cut your sidings a few inches smaller than the actual lengths.
Install the siding
On the inside corner, install a 2 by 2. This is the standard length for the inside corners, but it should depend on the length of yours, just make sure the siding buts square into the trim.
Since the starter was 1″ inch, the overlap will also definitely be 1″ inch. The standard width of the siding to use should be 8-inch but this again depends on what reveal you will need. For 8-inch siding, the reveal will be 7-inch. Make sure on the butt-ends you leave a 3/16″ inch gap.
Do the finishing
Use a high-quality caulk on the butt-end gap. Finally, use a painter for additional protection.